Project Breakdown: Residential Backyard from Lumion 10.5
Rendering Tips
What makes a beautiful render? In this blog post, we’ll pick apart the Lumion 10.5 backyard design and learn a few tips about building the setting, creating a style and mood, and more!
.jpg?access_token=8f21d484-e03e-4d83-b78f-e22ee3c6134c)
Most architectural renderings begin with a vision, a visualization in your mind of how you’d like your design to look and feel.
When going from your imagination to a rendered result, Lumion eases the entire render-creation process, helping you capture the entirety of your vision and show your CAD designs in their most beautiful light.
For some architects, this means importing your model, quickly planting a few trees and other objects around the building exterior, and rendering a beautiful image or short video. For others, it means infusing every nook and cranny of the project with emotion and atmosphere, crafting expansive landscapes surrounding the design or filling out interiors down to the smallest detail — a book on the nightstand next to the bed, an abandoned coffee cup on the kitchen table.
No matter how you want to show your design, Lumion gives you complete control over the entire render-making experience. In this blog post, we’ll be looking under the hood of one of our recent projects, the ‘Residential Backyard’ made in Lumion 10.5 Pro.
By exploring this rendering project, you can discover a few tips and tricks about building a setting, customizing materials, and using effects to capture a style and mood. After going through this project breakdown and applying a few techniques to your own workflows, you should find you’re able to render just a little faster, with a slightly nicer result.
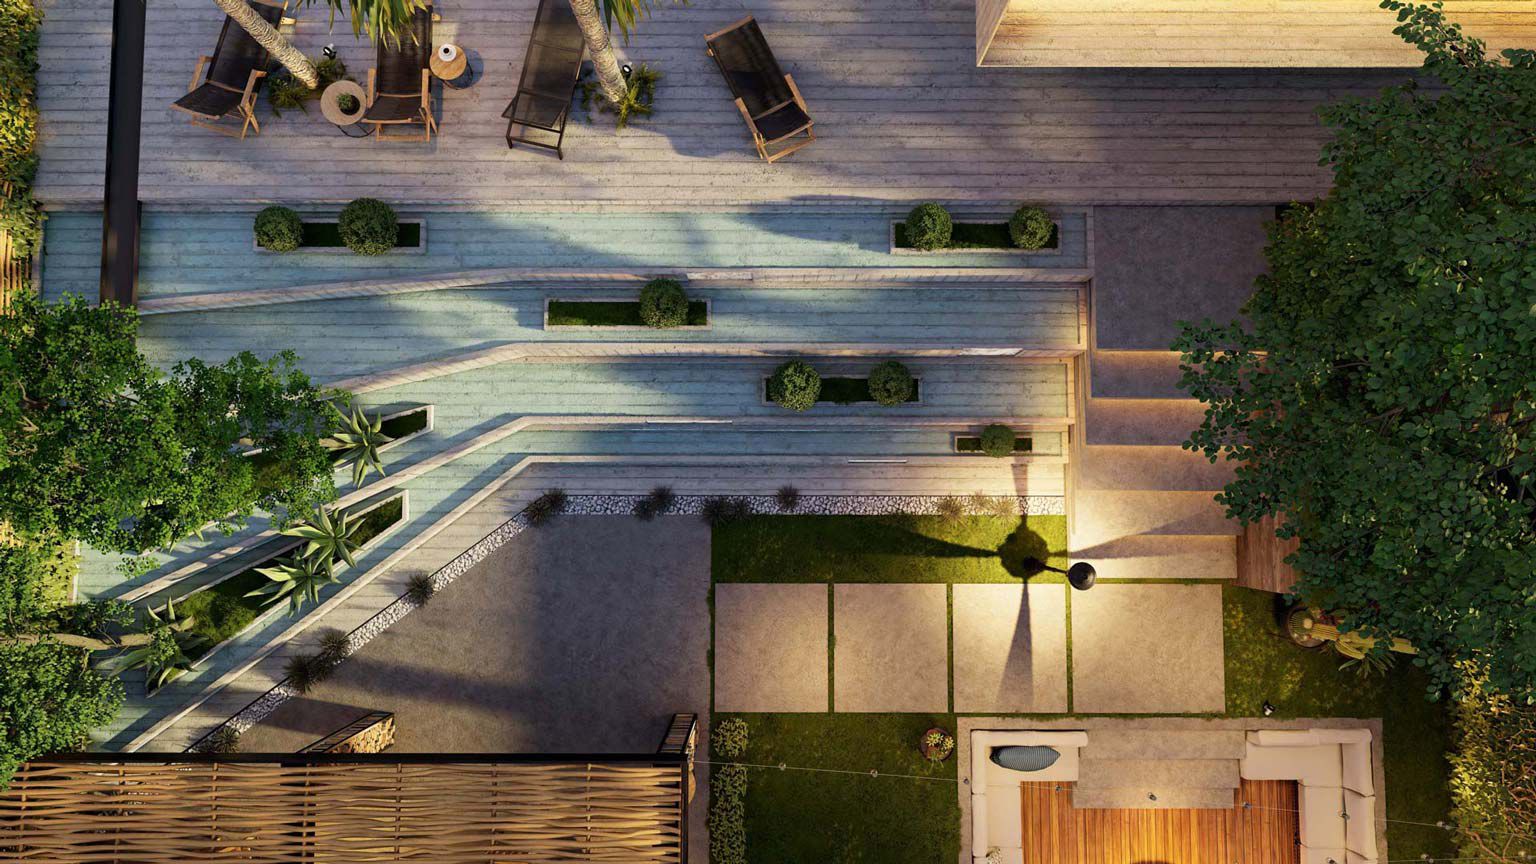
Importing the Residential Backyard
Every Lumion project begins with a 3D model in your preferred CAD modeling software. For this project breakdown, Lumion artist Gui Felix kindly shared one of his custom-made residential home designs that he modeled in SketchUp, showing a modern design for the backyard enthusiast.
Before preparing the backyard renderings, however, we asked ourselves, “What mood would we look to communicate? Dark, rainy and brooding? Sunny summer daze?” In the end, we decided to re-create the feeling of summer in the late afternoon, just before the sunset turns the sky red.
After importing the model into Lumion, we were able to fly through the scene and start experiencing some of the features of the design. We reviewed all the surfaces of the model and checked for errors, and we made sure all the materials were assigned correctly.
Because we used SketchUp as our CAD modeling software, we were able to turn on the LiveSync for SketchUp plugin and create a real-time connection to the model in Lumion. Therefore, if we made any changes to the model in SketchUp, we could instantly view them in Lumion.
After exploring the model in detail, and making adjustments when needed, the next step was to add materials and models from the Lumion content library to make the design feel like a real-life building in a lifelike setting.
Creating a lifelike setting with models and materials from the content library
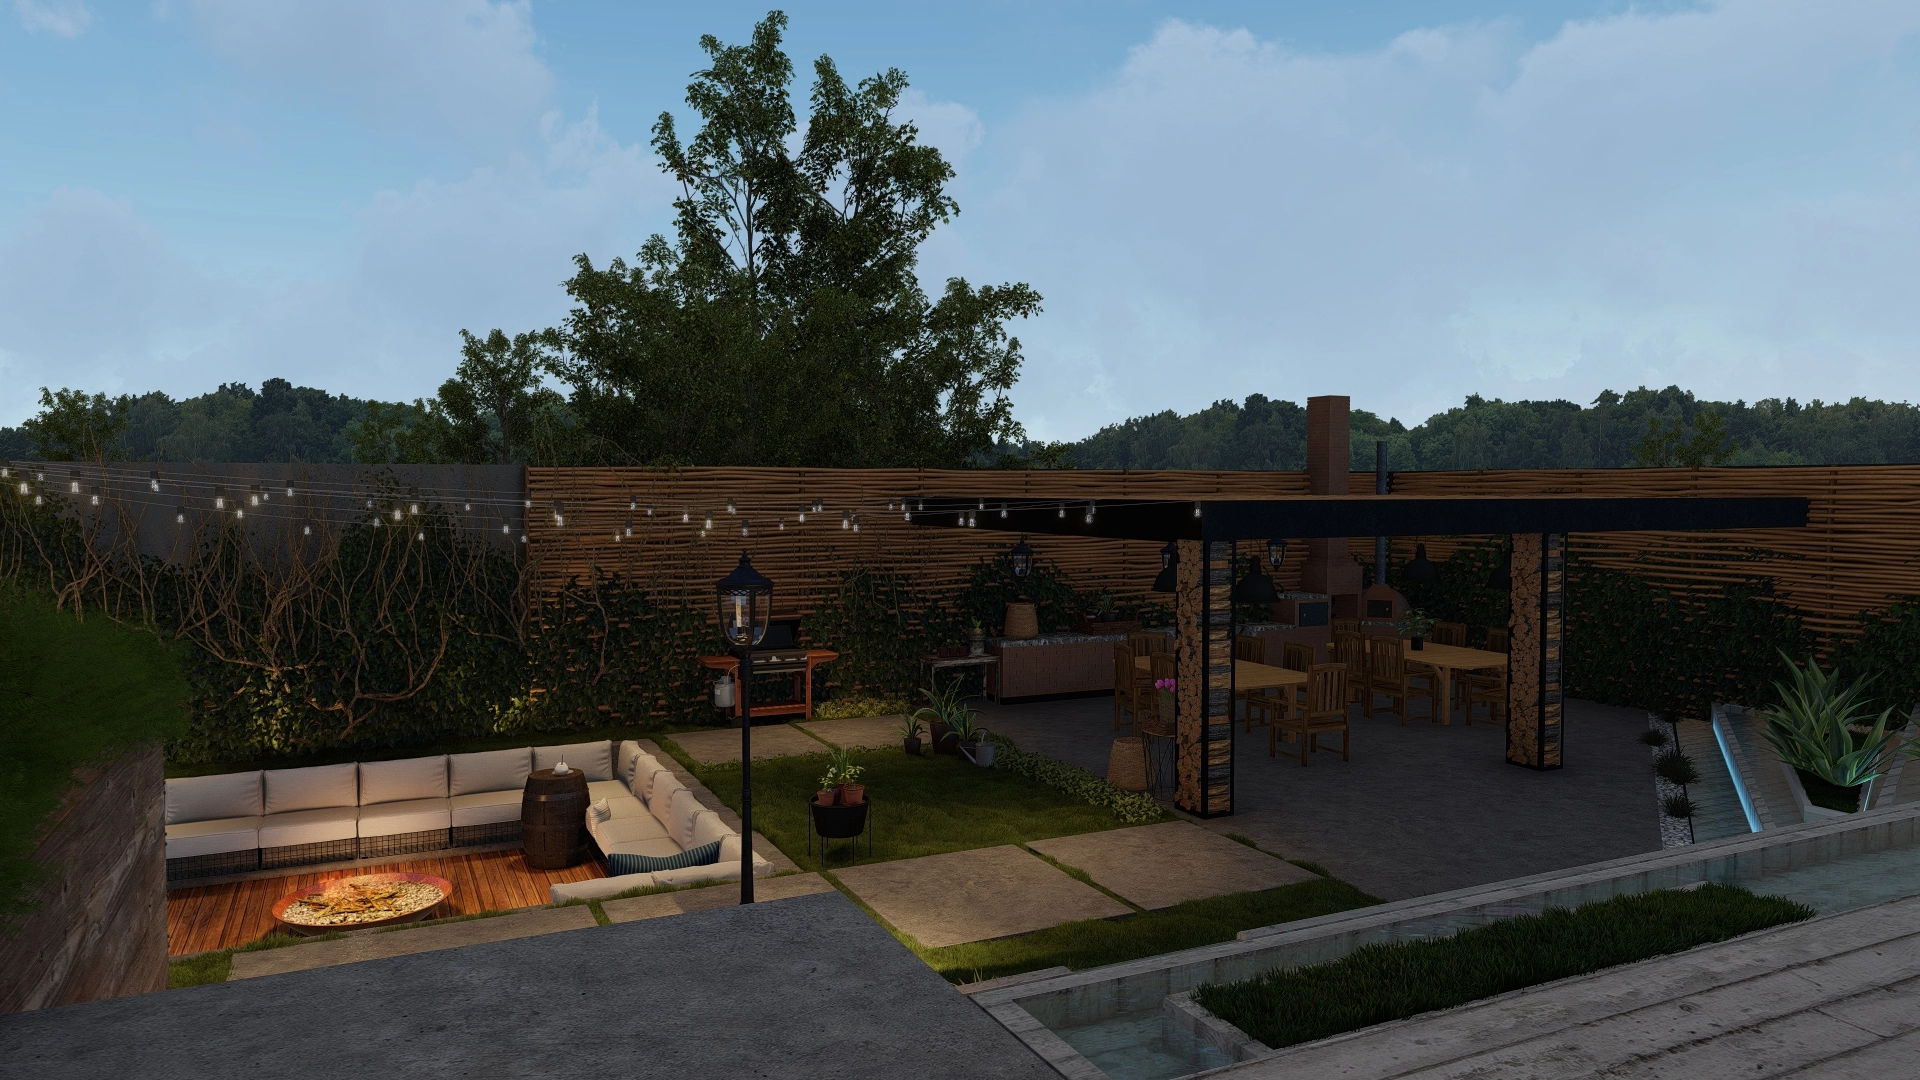
Our goal for this project was to create an attractive backyard setting using the new models that were added in the Lumion 10.5 release. In the seating area, for example, we added a few cushions and a barrel with a coffee cup to heighten a cozy, inviting feeling. We also had this idea of making the back wall look as natural-looking as possible, so we added a few ivy root models to the surface of the wall.
Moving from the seating area to the outdoor kitchen, we also wanted the viewer to pass by a small grill and a few plants, telling a story of backyard barbecues and a family enjoying their meals together.
Throughout the kitchen, we also added potted plants, wicker baskets and wall lanterns, which heightened the warm and welcoming mood with a luxurious twist.
By using hotkeys when placing objects, we were able to easily scale and rotate them for quick precision. To scale an object while placing it, simply hold down the “L” hotkey. If you would like to rotate the object while placing it, hold down the “R” hotkey. You can also use the “H” hotkey to control the height of the object placement, and you can instantly add an object to the project’s terrain with the “G” hotkey.
For the materials, we wanted to express a mix of nature and human-made materials, specifically grass, concrete, pebbles and water. You can see this mix of materials on the project’s water feature.
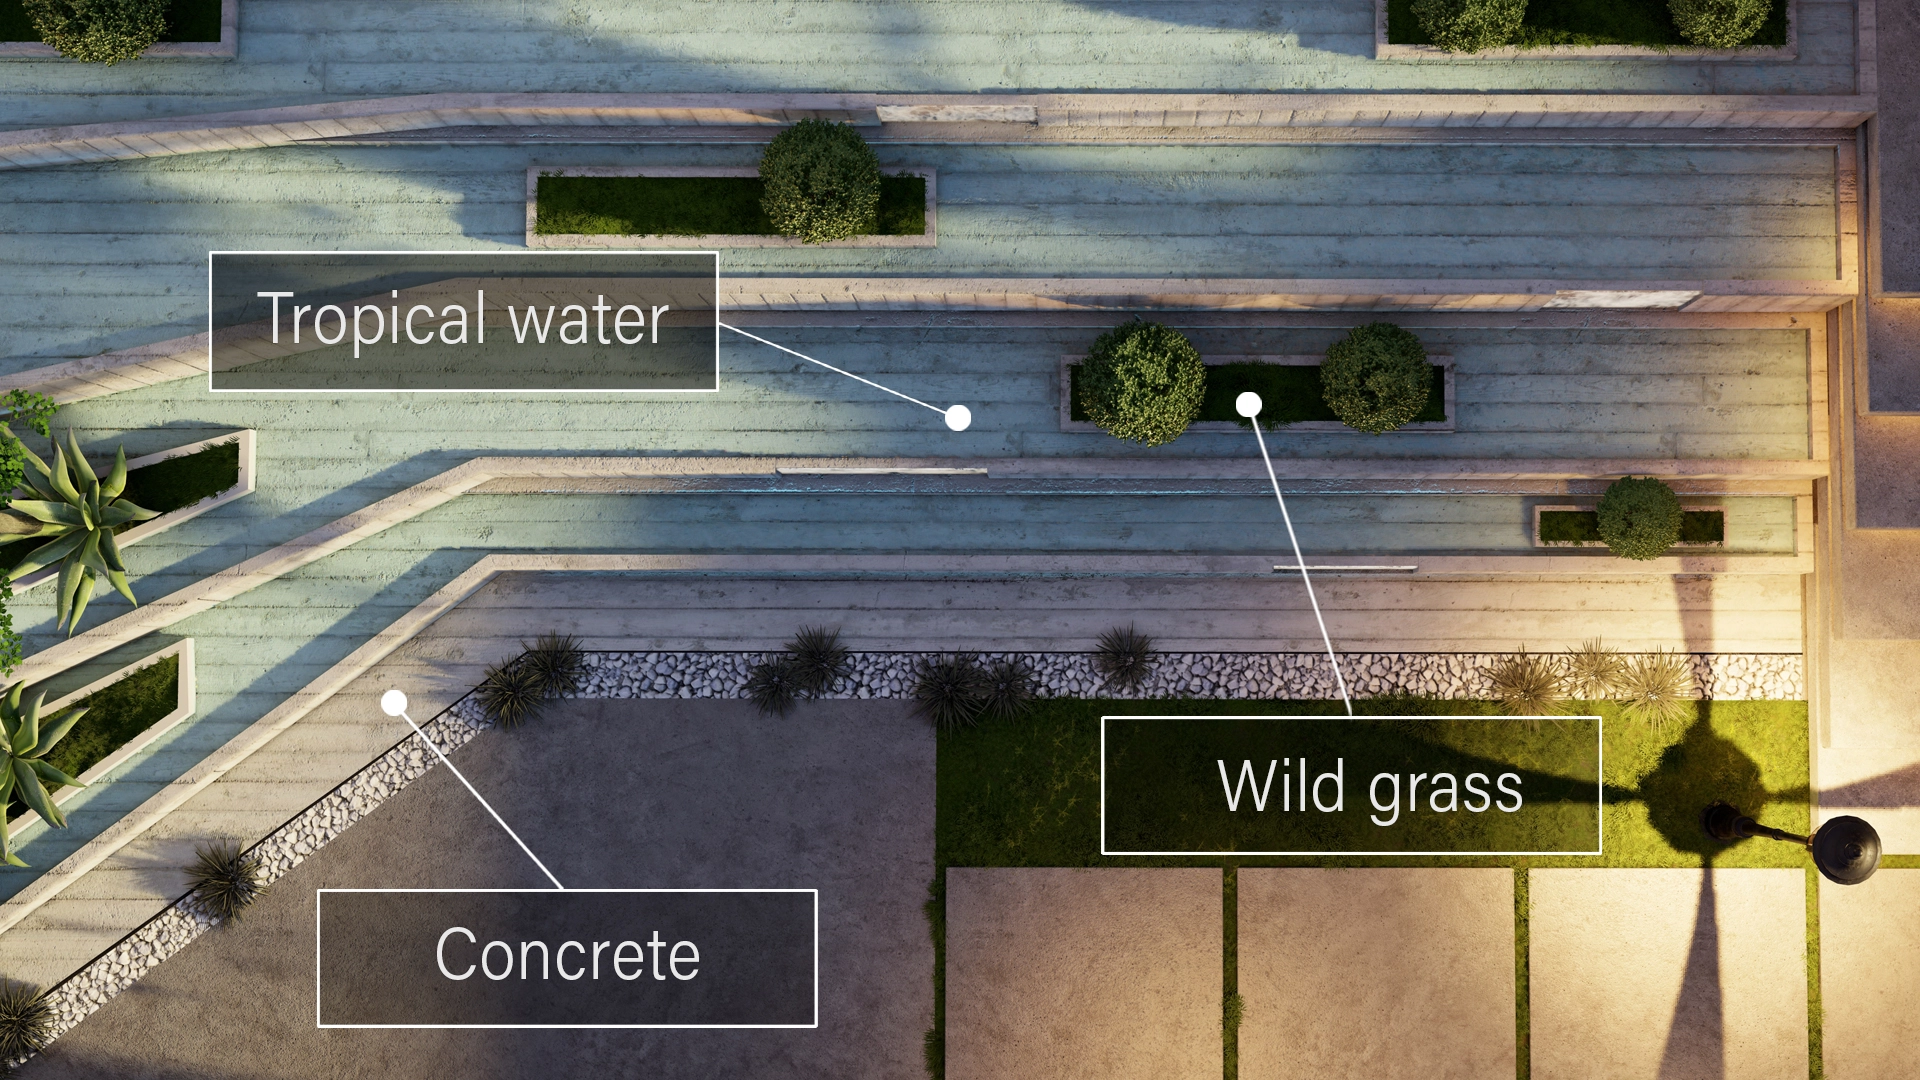
Here, we used the following combination of materials from the content library:
Wild Grass
Concrete
Tropical water
Ground gravel
Along the back wall of the backyard, we also added ‘foliage’ to the material by adjusting the material’s settings. You can see how we gave the back wall an attractive leafy covering in the video below, or check out this short tutorial on adding ‘foliage’ to materials.
Once we were satisfied with the model placements and the materials assignments, it was time to start making video clips and adding stylish effects to the project to heighten the mood we wanted to achieve.
Creating Movie Clips of the backyard project
Earlier in the process, when we were reviewing the backyard project in Lumion, we found a series of interesting views that we wanted to later turn into short video clips. With these movements in mind, we entered Lumion’s Movie Mode and started creating short camera movements from Point A to Point B.
For example, in the opening clip, we started with the viewer inside of the home design. Using the ‘Record’ option in Movie Mode, we then moved the camera between the chairs and out the door, before having the camera do a slight pan so that the viewer could take in the entirety of the backyard scene.
This first clip required three ‘camera keyframes’ to create a smooth, easy-to-view movement from the interior of the building to the outdoor setting. If the camera was moving too fast, we were able to edit the clip length to make the camera move a little slower.
Because we wanted to add these video clips together and maintain that smooth, easy-to-view movement, we also ticked the ‘ease in smooth’ and ‘ease out smooth’ buttons to ensure a consistent camera speed as the video moved from one clip to the next.
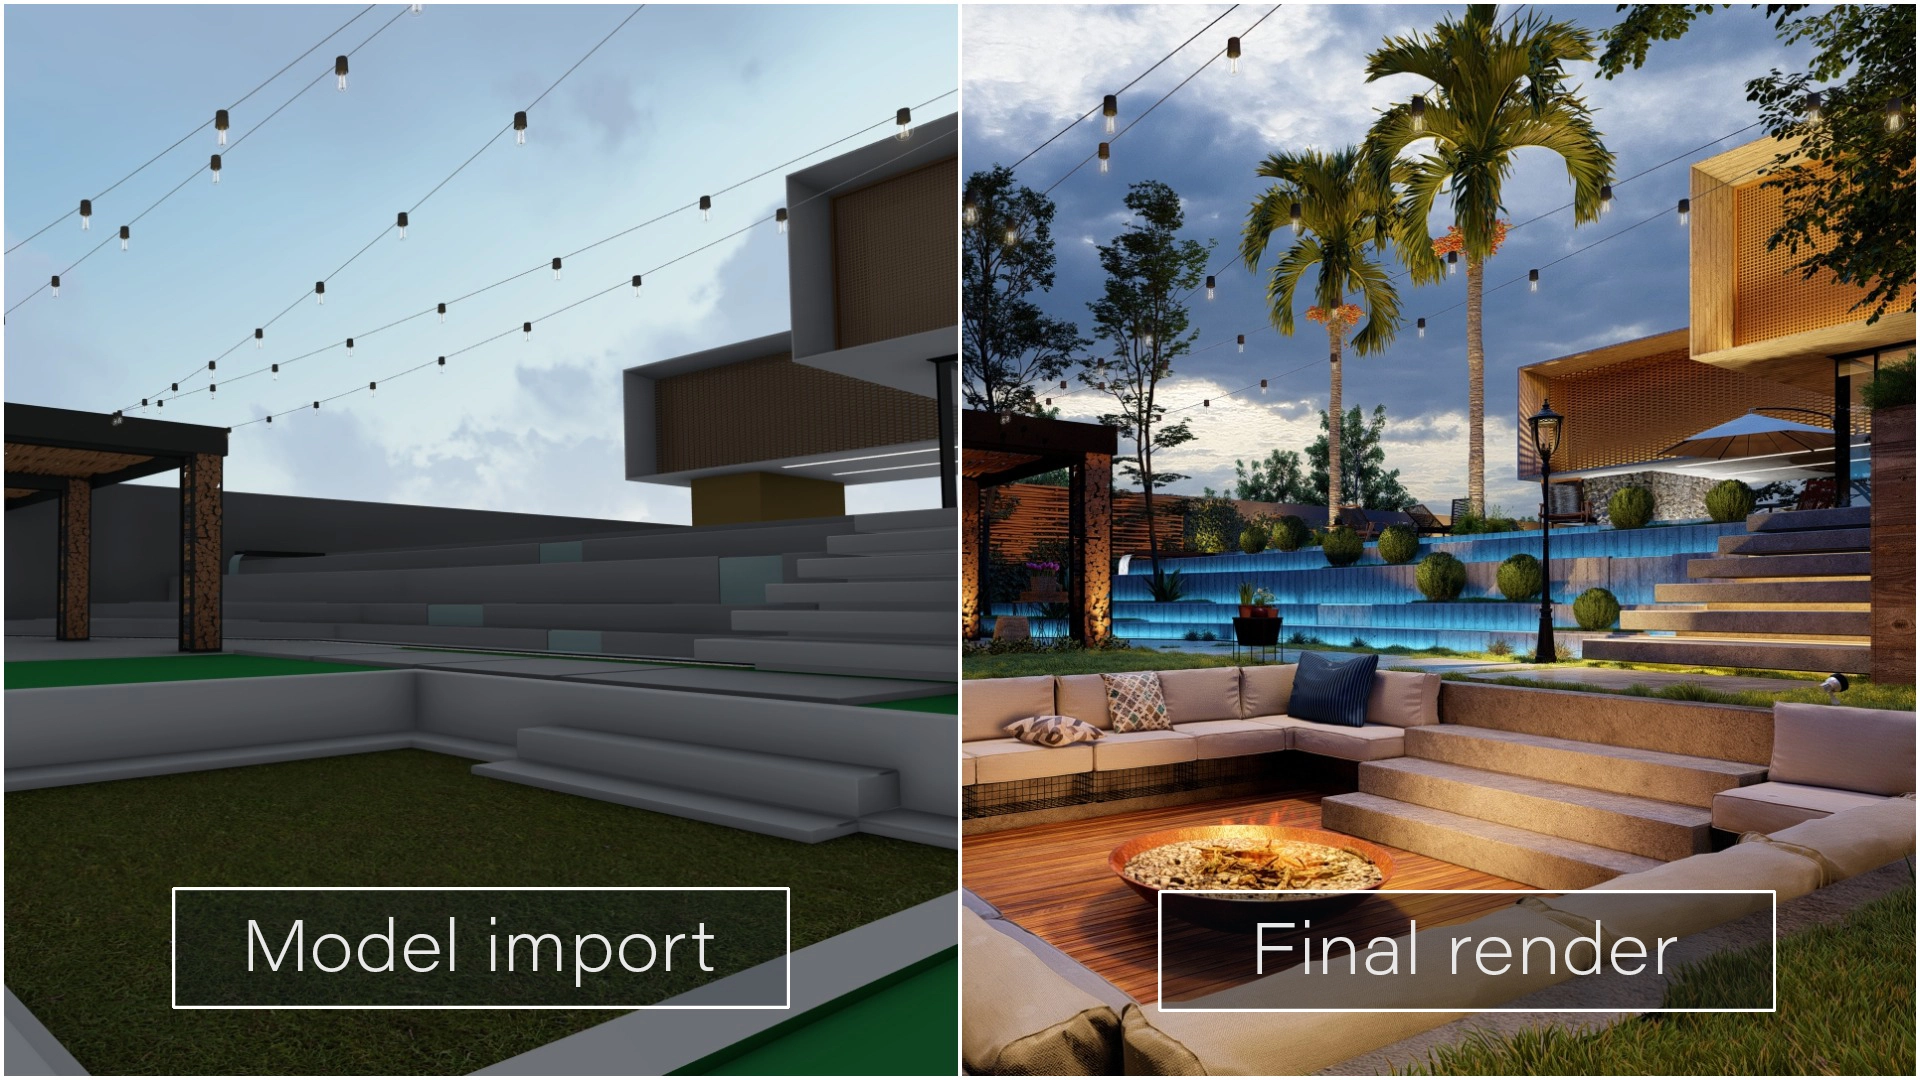
Capturing the late afternoon feeling with Lumion Movie effects
With a series of video clips showing multiple views of the backyard project, the final step was to set the mood using Lumion’s Movie Mode effects. As a reminder, before adding any of Lumion’s effects, our residential backyard design looked like this:
Without any Movie effects, the backyard was dark and bland; so the first thing we wondered was, “How do we get more light into this scene?”
Each of the eight clips in the final movie used a slightly different assortment of effects, although we wanted to make sure the feeling from one clip to the next was consistent. For this blog post, we’re going to focus solely on the effects in the first clip, where the camera moves from the inside of the house to the exterior.
To give us a good starting point, we added the ‘Realistic’ Style to create a robust lighting palette that would highlight detail and make colors feel more vibrant. We modified the ‘Shadow’ effect next to increase the sun shadow range and added ‘Sky Light’ to ensure an accurate diffusion of simulated sunlight.
Another important effect was the ‘Color Correction’ effect, as it can completely alter the style and mood of the final rendering. For this clip, we made a few slight adjustments to create a picture-perfect range of colors that highlighted the vibrant greens of the plants, trees and other nature objects.
Lastly, we modified the ‘Exposure’, ‘Sharpen’ and ‘Real Skies’ effects, updating the high-quality preview of the clip with each adjustment so that we had a better idea of the final result before rendering.
Beautiful renders are now within your reach
From internal design reviews to client meetings and more, Lumion significantly reduces the time it takes to create a beautiful rendering of your building design in its richly detailed, lifelike environment.
Never tried using Lumion before? By clicking the ‘Try’ button in the navigation bar of this website, you can download the 14-day free trial and learn a few of the basics via nine built-in Lumion example scenes. Or, you can try importing your own 3D model, adding a few models and materials from the content library, and applying the Photo or Movie Mode effects. You can also see what you can accomplish with features such as Mass Placement and Mass Move, or discover how easy it is to create a stylish mood with morning, afternoon, and evening lighting.